About

I'm Nicholas FitzRoy-Dale, a software developer in Sydney, Australia. I'm interested in embedded systems and operating system research, code optimisation, 8-bit music, rock climbing, shiny things...

Personal blog

Contact

Wed
May 23
2012

Hardware SID player

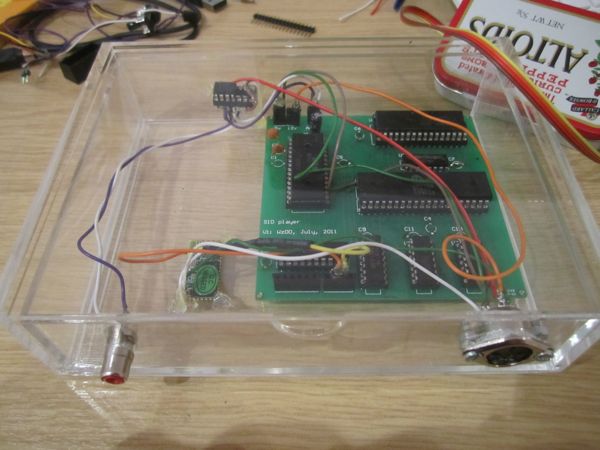
Today I finished my second hardware SID player. This is kind of a sneak peek: I’m planning on writing up the entire process, from conception, through to breadboarding, circuit design, layout, assembly, and case.

This device contains a 6502 processor, the same one (almost!) as was used in the Commodore 64. It also contains the Commodore 64’s well-known MOS 6581 chip, also known as the Sound Interface Device, which gave the C64 its distinctive sound. It plays real Commodore 64 sound files (SID files), which it receives via a Bluetooth serial connection.

SID files are interesting because they are actually raw binary 6502 code. In order to play the sound file you need a 6502 processor. All software SID players emulate a 6502 – this includes a real one instead.

Thu
May 3
2012

A simple DS18B20-based temperature logger

Update: Made temperature readings asynchronous and put the code on Github.

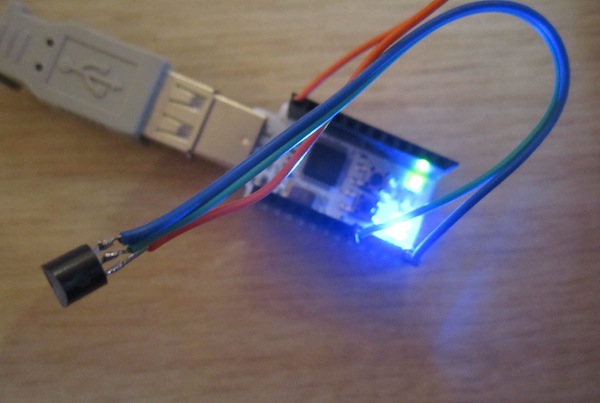
I recently made a little temperature logger, based on the DS18B20 temperature sensor and the Minimus AVR USB v1. This is a super cheap device: you can get DS18B20s for under £2 on eBay, probably cheaper in bulk, and my Minimus V1 was £2.50.

Hex file: logger.hex
Source code: logger.tar.gz

To set it up, get the hex file onto your Minimus. I use dfu-programmer: put the device into DFU mode by pressing reset, pressing the button that isn’t reset, releasing reset, and then releasing the other button; then run dfu-programmer at90usb162 flash logger.hex.

Connect the DS18B20: the data line should go into PORTD6. Connect power and ground lines appropriately.

To start logging, reset the device (if it’s in DFU mode), then press the hardware button. The blue light will start flashing to indicate that it’s recording. Memory is full when the blue light is solid.

When connected to a computer, the device presents a USB serial interface. Connect to it at 57600 bps, and press ? to see a menu. Most importantly, buttons 1 to 9 will change the recording frequency, and ’d’ will show the data.

The device logs to its internal EEPROM, which is quite small (1024 bytes). At the default logging frequency of once every 15 seconds, you get almost four and a half hours of recording. (One byte per measurement, 4 bytes used for EEPROM header).

Update: If you check out the Github repo and compile the code, you can instead choose to log to a 24Cxxx series external EEPROM. Connect the EEPROM so that A0=A1=A2=GND (ie, it is device 0 on the bus), connect the data line to PD1, and connect the clock line to PD0 – or edit logger.c (for the device number) or i2cmaster.S (for the ports). If you do this, you’ll want to change MAX_EEPROM_LOCATION in logger.c: it is currently set up for a 24C128 (i.e., 16 kilobytes of EEPROM).

It would be better to have the device show up as a USB mass storage device (i.e. a disk) rather than a USB serial port. I might work on that later.

Thanks to: the LUFA USB stack; the DS18x20 interface library; Peter Fleury’s I2C bitbang interface.

All my code is in the public domain. Email me with any questions.

Sat
Apr 7
2012

Hacking Android apps, part 1: the basics

Welcome to a short series of posts about modifying Android applications. The application to be used as a guinea pig in this case is Viber, a VOIP application for Android.

Assumed knowledge: some programming experience, access to a UNIX environment (such as Linux or OS X), and a rooted Android phone.

A short visual lesson in why the Android permissions system fails for complex apps

Android permissions provide a fine-grained way for applications to request elevated privilges. They are great when apps only request one or two permissions – for example, you might be okay with your music player connecting to the Internet but you might not be okay with it reading your contacts list. However, for sufficiently-large applications, the system breaks down.

On the left is Viber’s permission list, which is, I hope you will agree, somewhat ridiculous. If you can’t be bothered reading that, and I don’t blame you, the summary is that Viber is essentially asking for complete control of my phone. It can access my contacts, send SMSes, make calls, access the Internet – basically do whatever it likes.

Avoiding the whole question of whether these permissions are justified, the question then becomes: do I trust this app to use its many powers for good? I’m sure the Viber people are excellent and don’t want to do anything nasty with my phone, but even the best-intentioned software has bugs.

If I don’t trust the app, the only choice Google Play gives me is not to install the app. Trust the app and let it do everything, or don’t use it at all? These aren’t great choices. Fortunately, if you have a rooted device and are willing to write some code, these aren’t your only options.

Over the course of this series we’ll look at modifying Viber so that it doesn’t need a bunch of these permissions. In this introduction, you’ll set up the tools you need to modify Android apps, and make a very small change to Viber, to prevent it from adding a shortcut to your home screen.

Setting up your environment

JDK

You’ll need a Java development environment installed.

ADB

You’ll need ADB, which lets you do various useful things to your phone from your computer. ADB comes with the Android SDK, which I encourage you to install. This page on the CyanogenMod Wiki contains more information on installing the Android SDK and getting ADB set up.

Make sure ADB works and verify that you have a rooted device by running adb shell

You should get a root prompt on your phone.

Viber

Install Viber on your device.

On your computer, create a working directory. I created ~/tmp/viber.

You’ll now want to get the Viber APK onto your computer. Unfortunately, depending on your device, it could be in various places. Try:

adb shell ls /data/app |grep -i viber

If you see something like com.viber.voip-1.apk, then you’re set. Change to your new working directory and use ADB to download the APK from your device.

~$ cd tmp/viber
~/tmp/viber$ adb pull /data/app/com.viber.voip-1.apk com.viber.voip-orig.apk

If, however, you don’t see Viber installed in /data/app, it could be installed on the SD card. On my phone, SD card apps are available from /mnt/asec. Try:

adb pull /mnt/asec/com.viber.voip-1/pkg.apk com.viber.voip-orig.apk

apktool

Apktool is a nice program which saves a lot of time when working with APKs. Download it from here.

Opening the APK

An APK is a zip file containing everything required by the app. So in theory you could just unzip it, but instead we will use apktool. As well as unzipping the APK, apktool will run Baksmali (a disassembler) over the code, and will also convert the Manifest file to a text format (it’s stored in the APK in compiled form).

~/tmp/viber$ apktool d com.viber.voip-orig.apk apk

This produces a bunch of files in the apk directory. The decompiled source code is in the smali directory. Have a look around and familiarise yourself a little with the assembly language being used. For this, the best resource is the Smali wiki, but there is not a huge amount of information there. Smali is based on Jasmin, so it may be worth reading up on the Jasmin instruction set also.

Application signing

You have to sign your modified app using your own key. If you’ve done Android development before, you will have a debug key in ~/.android/debug.keystore and you can use this. If not, you should create a key using keytool:

~/tmp/viber$ keytool -genkey -v -keystore key.keystore -alias key -keyalg RSA -keysize 2048 -validity 10000

Keytool asks you for a password, and then asks a whole lot of questions which it will use to fill in the key. It doesn’t really matter how you answer these questions. If you’re only planning on using this keystore for your Viber modifications (recommended) then you can leave them blank, and you can also choose a very simple password.

Sanity check – does it work?

To check that everything is working up to this point, we’ll now re-build the app, without any changes.

Run apktool to rebuild the APK.

~/tmp/viber$ apktool b apk com.viber.voip.apk

Then, sign the APK with your new key. If you’re using the debug key, do this:

~/tmp/viber$ jarsigner -keystore ~/.android/debug.keystore -storepass android com.viber.voip.apk androiddebugkey

… if you’re using a key you generated above, do this instead:

~/tmp/viber$ jarsigner -keystore key.keystore -storepass password com.viber.voip.apk key

Install the app:

~/tmp/viber$ adb install com.viber.voip.apk

Now run it on your device (you may want to turn on airplane mode first).

Modifying the APK: removing the shortcut-adding code

When you first run Viber, it adds a shortcut to your home screen. Let’s stop it from doing that.

A quick search for “android shortcut api” reveals A stackoverflow.com post with code to create a shortcut on the launcher desktop. The key part of that code is this Intent:

com.android.launcher.action.INSTALL_SHORTCUT

That looks like an obvious thing to search for in the code, so let’s do that:

~/tmp/viber$ grep -r INSTALL_SHORTCUT apk/smali/*
apk/smali/com/viber/voip/IdleActivity.smali:    const-string v5, "com.android.launcher.action.UNINSTALL_SHORTCUT"
apk/smali/com/viber/voip/IdleActivity.smali:    const-string v5, "com.android.launcher.action.INSTALL_SHORTCUT"

Great! The shortcut code seems to reside in a single file. Open that file in your favourite text editor.

~/tmp/viber$ vim apk/smali/com/viber/voip/IdleActivity.smali

You’ll see that the INSTALL_SHORTCUT code is called from a method named “setupShortcut”:

.method public setupShortcut(Z)V

The method parameters are encoded in the Java JNI format, as described on the Smali wiki. Referencing that, you can see that setupShortcut takes a single Boolean as parameter (the Z) and returns void (the V).

Let’s delete the entire method body. Delete the entire method, from the line beginning with .method public setupShortcut to the line beginning with .end method. Replace it with this:

.method public setupShortcut(Z)V
.locals 0
.parameter "sendBroadcast"

return-void
.end method

This is basically the minimum we need. The locals line tells the assembler that the method doesn’t use any local variables. The parameter line identifies the method argument, and the return-void line does what it suggests – unlike Java, Smali methods must always return something explicitly, even if it is void.

Now rebuild the APK as before, and reinstall it:

~/tmp/viber$ adb uninstall com.viber.voip
~/tmp/viber$ apktool b apk com.viber.voip.apk
~/tmp/viber$ jarsigner -keystore key.keystore -storepass password com.viber.voip.apk key
~/tmp/viber$ adb install com.viber.voip.apk

Relaunch the app on your phone, and you will see that it does not create a shortcut on your desktop any more. To be doubly sure, you can also remove the appropriate permission lines from apk/AndroidManifest.xml – they’re the ones that have SHORTCUT in the name – and reinstall. Now the application can’t possibly create shortcuts, even if we missed something.

In the next entry, we’ll get a little more complicated, by preventing Viber from accessing your contact list.

Mon
Apr 2
2012

Profligate Spending

Here’s a preview of a really simple Android app I’m working on, called Profligate Spending. I am working on a tight budget at the moment, and I need to keep track of my discretionary spending (something I’m quite bad at). This is the app I’m going to use to do it.

When it’s done, you’ll be able to enter a maximum spend for the day, week, or month. When you buy things you’ll put the amount into the app, and it will then tell you whether you’re going over budget or not. It will remember previous days’ spends, so you can save up for large purchases.

The “put the amount into the app” part is where all finance tracking apps fall down, because nobody wants to do that. I am making it as frictionless as possible: entering small amounts is five presses (one to launch the app, three to enter an amount in pence, and one to add it). Still, I think it requires a motivated user.

If you have any ideas for apps like this, let me know. It’s a pity my first non-work app is for something as dull as personal finances, but, well. Actually, the more fun I can make it, the more I will use it – so please send any ideas about that my way, too.

Fri
Jan 27
2012

UK keyboard layout with Swedish character support for Windows

I’m learning Swedish, but my keyboard doesn’t have keys for å, ä, and ö. Most of the time I use a Mac and can get these letters relatively easily using the option key. On Windows it’s not nearly so easy – the common advice to get a å, for example, is to hold down alt and type 134. Might be okay if you only have to do it once, ludicrous otherwise. Microsoft includes an alternative keyboard layout for international use, called UK Extended. UK Extended, it turns out, has been cleverly designed so as to be able to produce two-thirds of the letters I need. So I built my own keyboard layout using Microsoft Keyboard Layout Creator. I just took the standard UK English keyboard and mapped Swedish keys to it, as follows: * å: AltGr + a * ä: AltGr + q * ö: AltGr + o I’m not too happy about AltGr + q. If you’ve got a better suggestion let me know. Here is the installer – just run it, and then select the new keyboard layout from control panel (it’s in the keyboard portion of regional settings): UK keyboard with Swedish letters: sweuk.zip (248k) Here is the keyboard source file for MKLC if you would like to build your own: Source code for UK keyboard with Swedish letters: UK-Swe keyboard.klc (13k) Lycka till!

Mon
Jan 2
2012

A couple of things I learnt from Chaos Communication Congress #28 videos

  1. The key to sucess with cartesian genetic programming is a subtlety: the chosen child from the set of mutants should be as good as, or better than, its parent. You would think that it would be more efficient to always choose children which are better than their parents. This turns out not to be the case. By choosing children which are at least as good as their parents, we are allowing mutations to accumulate. This allows us to perform neutral search, in which we investigate several areas on the flat spot of the “fitness hill”. If we don’t do this, then we are relying on a single magic mutation to push us upwards. If instead we allow mutations to accumulate we don’t have to rely on a single magic mutation, but instead can allow one mutation to activate several other accumulated mutations. (Automatic Algorithm Invention with a GPU)
  2. In Commodore 64 demos, you can use a counter to keep track of frame-by-frame jitter. However, in your interrupt service routine, you would normally have to examine the counter and then perform a computed jump, or do some other calculation, to perform different actions depending on the jitter value. This consumes a lot of cycles. Instead, you can set the interrupt service routine vector to be the jitter counter itself. When an interrupt occurs, the C64 will use the current value of the jitter counter as the location of the interrupt service routine. You can then put code in all locations in memory corresponding to the possible values of the jitter counter. (Behind the scenes of a C64 demo).
Thu
Dec 22
2011

Jailbreak the Patriarchy

I ported Danielle Sucher’s Jailbreak the Patriarchy to Safari.

You can download it here: Jailbreak the Patriarchy, version 1.

Please let me know if there are any issues: wzdd.code@lardcave.net. One known problem is that the toolbar icon doesn’t change when you click it. I don’t think you can actually do that in Safari.

Sat
Nov 19
2011

Compiling clisp with Homebrew on Mac OS X Lion with XCode 4

LLVM in XCode 4 apparently doesn’t define HAVE_STDBOOL_H. So, edit /usr/local/Library/Formula/clisp.rb and add the following line:

ENV['CFLAGS'] += ' -DHAVE_STDBOOL_H'

Put it somewhere after ENV.j1 in the install function.

Thu
Jul 7
2011

Python: Throwing an exception into a generator

EDIT: Thanks to Andrew Bennets, this problem is solved – Python supports exactly the feature I am after using the “throw” method of generator objects. Original post below for interest’s sake.

I’m writing some code that uses an asynchronous coding style, using generators.

Here’s how the code works:

def rpcClient():
	initialisation()

	result = yield someBlockingFunction
	doSomethingWith(result)

	result = yield someOtherBlockingFunction
	doSomethingWith(result)

Here, rpcClient does some initialisation. After initialisation, it would like to call someBlockingFunction, but it doesn’t want to block. So, instead, it passes the name of the function to its caller, via yield. The function is then called somehow (details later). When the function returns, its return value is passed back to rpcClient as “result”.

The problem with this scheme is: what happens if someBlockingFunction() raises an exception? What I would like to do is throw the exception back into rpcClient, so that (from the perspective of rpcClient) it looks like the yield itself generated the exception.

As far as I can tell, there isn’t a way to do that. It’s kind of unfortunate, because the method above is otherwise a very neat (as in, few LOC, relatively comprehensible) to handle blocking functions without “stack smashing” or introducing extra threads.

I can’t even do something like define a function to do the yield for me, because in Python the decision about whether a function is a generator or not is made at compile time and is based on the presence of specific syntax (i.e. the word “yield”).

(In my code, someBlockingFunction is actually an RPC call. When you call it, you pass a callback, which is then called when the function returns. So the code calling rpcClient can handle all that detail behind-the-scenes, without requiring the complexity of the RPC to “escape” into all RPC clients.)

Mon
Jun 20
2011

Automating Quicktime Player 7's audio conversion

Here is a little AppleScript to use Quicktime Player 7 (on a Mac) to mass-convert a directory full of audio files from one format to another.

To use it, open it in Script Editor, change the “basedir” setting to whatever your directory of files is, and change “*.spx” to whatever glob pattern matches your input format.

It’s based on http://ldopa.net/2008/05/23/batch-export-for-quicktime-pro/, but adds support for globbing and doesn’t require you to move your files around.

Newer entries | Older entries