About

I'm Nicholas FitzRoy-Dale, a software developer in Sydney, Australia. I'm interested in embedded systems and operating system research, code optimisation, 8-bit music, rock climbing, shiny things...

Personal blog

Contact

Sun
Jun 19
2011

King Battle!

I’m pleased to announce my first Gamejam game, King Battle!

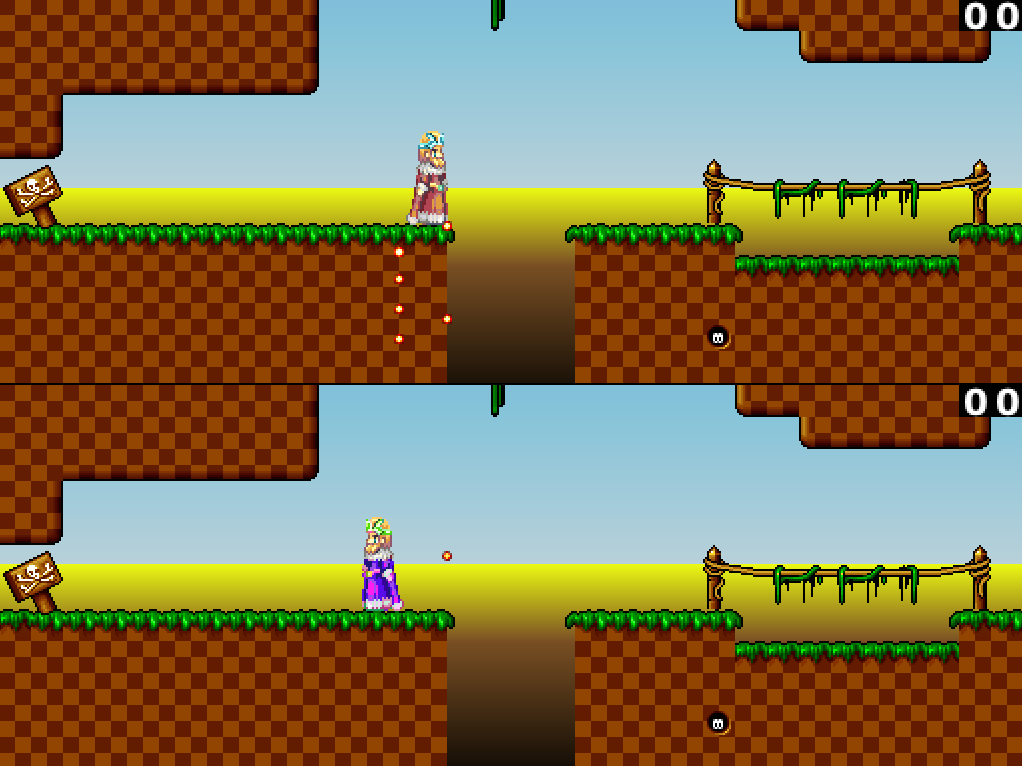
King Battle is a split-screen platform game for 2 players. You and your friend must race your respective kings across a short scrolling platformer-like level to get the crown. Simultaneously, you must prevent your friend from getting to the crown before you do. In order to stop him, you can fire bullets at him. It turned out pretty well!

You start out in the level selection screen – jump on a crown to select a level. You can return to this screen at any time by hitting ESC.

As you kill the other king, or when you get the crown, your score (upper right hand side) increases. When you get shot, or when you fall into a pit of razor-sharp spikes, your score decreases – but it never goes below 0. A king’s gotta have some pride.

Player 1 keys: A and D to move left and right; W to jump, left shift to accelerate / shoot bullets.

Player 2 keys: Arrow keys to move; up arrow to jump, right shift to accelerate / shoot bullets.

If it’s easier, you can also use left alt and right alt to accelerate or shoot.

Download!

License

There are no restrictions on what you can do with King Battle’s code and sound. You can do anything you like, up to and including selling it yourself without crediting me or providing source code (and good luck to you :). Some of the graphic files, however, require credit and links. Check the credits file (see below) for details.

Technical stuff

I wrote most of this game last weekend for a game jam. Unfortunately, I didn’t finish it in time, so I spent this weekend polishing it up. This was my first gamejam, my first “real” game, my first use of the Love 2D framework, and my first real use of Lua (the language of Love). There are still lots of bugs and clunky sections, which I probably now won’t have time to fix.

Even though I didn’t finish in time, it’s not that easy to come up with a game jam moral, such as “know your limitations” or “plan a very simple game”. I already knew these things, and still didn’t make it. Writing a game to a very tight deadline is not something you are going to know how to do in advance. My advice is just to try it, to (probably) fail, and to do it again.

Most of the problems I had were due to my being new to writing games, and new to the Love 2D framework, but I developed a legitimate dislike for Lua. It seems like it was developed by well-meaning people who then never actually used it. For example, retrieval from a dictionary always succeeds with the special value “nil”. I never want this. Another interesting choice is that, in Lua, arrays start from 1. This is really silly, especially when you are dealing with, say, screen co-ordinates, which start from 0. Using 1-based indices also defies a fairly well-established convention for no good reason. Adding to the annoyance is that using a zero index works, and returns – wait for it – nil. There are various syntactic inconsistencies, especially around array construction. There is a special “length of array” operator, which works unless you want to store “nil” in your arrays – if you want to do that, you have to use a special function instead. OO is very messy. And so on.

Credits

Here is a full list of credits. Thanks especially to Catie for level writing and play testing.

Feedback

I’d love to hear from you. If you want to tell me anything about King Battle, send email to wzdd lardcave net.

Thu
Jun 9
2011

DIY USB-Serial Cable

Ever since I saw Minty Boost I knew that I wanted to make a small electronic device and put it in a funky case. Well, tonight I can finally sleep the untroubled sleep of one whose desires are fulfilled. Behold, the Tic Tac USB-Serial cable, Cherry Passion edition!

  1. Eat all the Tic Tacs.
  2. Assemble a USB Serial cable.
  3. Place the cable circuit board in the Tic Tac box. Add hot glue and masking tape for authenticity.

This uses the famous FTDI FT232RL chip to present a USB serial interface to a computer at one end, while presenting TTL-level serial lines on the other. I made mine mimic FTDI’s standard cable, with a 6-socket header at the TTL end. (It contains transmit, receive, power, and flow control lines.)

The chip itself is only available in various surface-mount formats, so I prudently circumvented a fine-wire-soldering nightmare (and ensuing insanity) by purchasing a a 28-pin SSOP breakout.

Soldering surface mount components is easier than people claim as long as you douse the area in flux first, a technique I learnt from electronics wizard Dave Snowdon.

Speaking of dousing things in other things, I hope you are appreciating the hot glue job I did here.

Here is the device programming a Nanode.

Click images for larger versions.

Tue
Jan 25
2011

The Huawei Ascend M860 Uses A Qualcomm MSM7625 System-On-Chip

I am working with this phone, also known as the Huawei Ascend, and it’s been very hard to get good information about it. It is claimed to use at least three separate SOCs – the MSM7201, the MSM7625, and the MSM7627.

Of course only of these can be true, and the truth is that it uses an MSM7625. This is the CDMA version of the MSM7225. Unlike the MSM7627, which has an Adreno 200 GPU onboard, the 7625 does not have an onboard GPU.

I suspected the M860 had the 7625 SOC because the onboard kernel configuration (in /proc/config.gz) indicates it, and because the only configuration that builds without modification in the Huawei-released kernel sources is for the 7625. But of course I couldn’t be sure without taking the phone apart and photographing the chips, so that’s what I did. I don’t recommend you do this if you don’t have to.

Part of the problem is that the phone is apparently overclocked to 600MHz from the standard 528MHz.

More photos: The whole board; The SOC (each file is around 1.5MB)

Fri
Jan 14
2011

D-Link antenna boost


I recently hacked a beefier antenna into our D-Link DSL-2640R router, following this guide here. There was nothing complicated about it but I had to buy two things:

  1. A “U.FL to RP-SMA female” pigtail cable. I bought this one (ebay) for £2
  2. A beefier antenna. I bought this one (ebay) for £7.

Benefits: I can now watch Youtube videos on my iPad while lying in bed, I don’t have to string cables into my study, and (hopefully) the XBox won’t randomly stop streaming МУХА (video) songs from my desktop machine while I’m trying to beat da police.

More pics: 1: Look, it still works! 2: The back.

D-Link equipment sucks, but I made it suck less!

Wed
Nov 24
2010

Splitting Android boot.img files


I’ve had to do this twice now, and if I understand my computer science mythology correctly that means I will need to do it an infinite number of times, so:

  1. Get split_bootimg.pl from here, or use my mirror.
  2. Run it on your boot.img to get the kernel and ramdisk files.

Lots of information on Android’s (simple) boot.img format is here. Thanks to William Enck for split_bootimg.pl.

Tue
Oct 19
2010

Sega Dreamcast Maple Bus Interface

Updated post

Arduino-maple is a program for 16MHz Atmega-based devices (such as the Arduino) which enables them to impersonate a Sega Dreamcast for the purpose of communicating with devices attached to Sega’s proprietary Maple bus. The practical upshot of this is that you can use an Arduino or similar cheap board connected to a PC to communicate with Dreamcast controllers and Visual Memory Units.

The code requires avr-gcc, and has been tested on Debian Linux, Mac OS X, and Windows (use winavr for Windows). It is still quite rough code, so proceed at your own risk. It is known to be able to read from and write to controllers and the Dreamcast Visual Memory Unit.

The code has very specific timing requirements and will almost certainly only run on an ATmega part clocked at a 16MHz using a crystal oscillator.

Download arduino-maple from bitbucket (or download a snapshot: arduino-maple-tip.tar.gz)

To set it up you’ll need to compile the code and get it onto the Arduino (or other ATmega part). Make sure avr-gcc and friends are in your path, then type “make”. If that works, ensure the port is correct for your computer in the Makefile (it’s the line starting PORT=), and type “make upload” to run avrdude and upload the code.

After that, connect one end of a Maple bus to your Arduino. I did this by buying a Dreamcast controller on EBay for £4 and cutting the connector off. Attach the wires as follows:

  • Blue: +5V
  • Black / unshielded: Ground
  • Red: Arduino Pin 8 / PORTB 0
  • White: Arduino Pin 9 / PORTB 1
  • Green: Leave disconnected (or connect to Ground if you like)

Once you have that set up, you can run a Python program, “maple.py”, to test. If you have a VMU, ensure it is connected to the controller’s upper port first. The program will print out information about the controller and VMU, display a picture of Astro Boy on the VMU, and sit in a loop reading the controller. Press some buttons on the controller, and you’ll see the changes to the controller state displayed by the test code. Press ctrl-c to exit the test program.

Other test programs:

  • “vmu_dump.py” dumps the contents of the VMU in the upper controller slot to disk. This will create a 128 KB file that you can flash, open with VMU Explorer, and so on.
  • “vmu_flash.py” writes a VMU flash image to the VMU.

I owe a huge debt of thanks to Marcus Comstedt for his very helpful Dreamcast information pages, and to Ikalogic for their low-cost logic analyser.

Changes:

22/Oct/2010: Reading from the VMU is now stable thanks to several code tweaks. Also, no extra hardware is required (the previous version needed some external pull-up resistors). This was still much less stable than I wanted; see the updated code for a better approach.

24/Oct/2010: Reading from the VMU’s flash is now supported.

Tue
Oct 19
2010

8-Bit News

Time to blog about some older projects…

I made a silly Safari extension to rewrite Google News in an 8-bit style.


8bitnews download page

Despite being a bit silly, this project had a real purpose, which was to make the Google News page less cluttered. Most of the extension is about removing things. Google News adds a lot of unnecessary information to the news page – the only non-news part preserved by 8bitnews is the link to other articles, because this ability to see multiple interpretations of the same story is the best part about Google News.

There are two other parts to the extension.

The first other part adds a custom font. This wasn’t hard at all – extensions can bundle resources and reference them – but many C64 fonts didn’t actually display in Safari for some reason, even though I could preview them with Font Book. I eventually managed to find a reasonably-licensed font that worked.

The final part of the project is the image manipulation. 8bitnews redisplays each image at 4x scale using a Commodore 64 palette. To convert to the C64 palette, I copied the image to a Canvas object, then accessed the image data from there to choose to most appropriate colour. To choose the best colour, each pixel is converted to the HSL colour space. This is important because variations in saturation and luminance are far less visually annoying than variations in hue.

The pictures mostly look pretty bad, but sometimes there are some gems.

An interesting security consideration: the extension JavaScript is injected into the Google News page and thus behaves as if it were served by the Google News web server. This means that the extension script is prohibited from accessing the image data of images that were served by other Web sites, due to the same-origin policy. Happily, Google News seems to encode about 90% of their images as base64 and include them directly in the HTML page, so this wasn’t a problem in practise.

(Incidentally, this is a bit of a weird policy… if the browser makers are worried about malicious (XSS-injected, say) JavaScript modifying an image, well, the JS can easily hide that image and substitute its own without violating the policy. If they are worried about information leakage, well, the JS has access to a whole lot of metadata about the image, such as its width and height – these may have been supplied by a third party as well. So the policy seems rather inconsistent.)

Mon
Sep 20
2010

Reading the cycle counter on an HTC Desire

I wanted to do some performance monitoring on an HTC Desire phone – nothing complex, just to be able to read the CPU cycle counter. Unfortunately this is more complicated than one might expect, because

  • The performance monitor unit can’t be accessed from user-space (even by root), and
  • The stock kernel doesn’t include support for performance monitoring.

To cut a long story short, it turns out the reason for the second bullet point above is that the kernel doesn’t include support for the perf_events framework for the QSD 8250, which is the SOC present in the HTC Desire. Fortunately, adding the support is easy to do, because the QST 8250 is similar to the already-supported Cortex M8.

So, to do it:

  1. Root your Desire
  2. Install Cyanogenmod 6.0.1
  3. Download the Cyanogen kernel and patch it
  4. Install the new kernel.

I’m going to focus on step 3. Get the kernel – currently you can do that this way: (source):

git clone git://github.com/teamdesire/cm-kernel.git
cd cm-kernel
make cyanogen_bravo_defconfig
make 

Apply the patch I made: qst_8250_perf_events.patch.

Rebuild the kernel according the above instructions and generate a boot.img. If you’re going to do this via mkbootimg, the command-line to use is this:

mkbootimg --cmdline 'no_console_suspend=1 msmsdcc_sdioirq=1
wire.search_count=5' --kernel zImage --ramdisk boot.img-ramdisk.gz
--base 0x20000000 -o new.boot.img

Flash it from the clockwordmod recovery console by mounting the sdcard, pushing the new image using adb and then using the flash_image command:

adb shell flash_image boot /sdcard/new.boot.img

To test it you’ll need perf. I was not in the mood to compile perf, so I wrote a small tool. This tool is named miniperf, but that’s a rather ostentatious name because all it does is print the cycle count, sleep for five seconds, print the cycle count again, and exit.

Download it here: miniperf.tar.gz

It compiles with agcc. You will have to change the obvious in the Makefile. Note that the cycle counter is reset when you start miniperf. I have tested it for all of five minutes, so give no guarantees that this works or does anything at all. :)

Happy cycle counting!

Fri
Jul 9
2010

Python snippet: nicer Python tracebacks

Python exceptions are really helpful but they’re also rather ugly. Here’s a mean one I encountered today. Don’t try to interpret it – it’s only here to show off its ugliness:

I wanted it to look more like this:

So I wrote some code to do that. Specifically, the exception formatter I wrote does the following:

  1. Prints only the 5 deepest stack frames (older frames are usually noise)
  2. Prints code from only the 3 deepest stack frames (same reasoning)
  3. Prints as little of the file name as possible – the .py suffix is removed, as is any directory information above the current working directory
  4. Prints file names and method names lined up, one after the other. Note that the messy traceback above almost does this already, but that’s just luck.
  5. If Pygments is installed, syntax-highlights the code.

All of the above is, of course, configurable.

Here’s the code:

bettertb.py

Usage:

import bettertb
bettertb.run(your_main_function, arg1, arg2, ...)

This is a pretty quick and dirty work in progress, so email me (nicholas at lardcave) if you have suggestions, fixes, etc. The first major problem is that getting tracebacks is now more rewarding than having the code finish successfully.

Sat
Oct 24
2009

Texdown: LaTeX simplified. A lot.

Like all students, I hate LaTeX. It’s old and outdated and it looks funny and it smells and… aww, I can’t go on. I love LaTeX. I love the way it’s a standard, and I love the way Leslie Lamport’s book about LaTeX is illustrated with anthropomorphic animals. Most of all I love the look of the PDFs it generates.

Despite being awesome, LaTeX shares a couple of annoying characteristics with HTML:

  1. Like HTML, it’s hard to syntax highlight. LaTeX is really a very flexible programming language, and that means that doing syntax highlight “right” means you have to do something pretty-much equivalent to actually running LaTeX. Here’s an example of Vim doing it wrong:

    This is from Vim. Emacs is a bit better, but not perfect – I’ll get to that below. The point here is that Vim has dutifully syntax highlighted all the LaTeX commands. But is that really what you want? For me, the answer is usually “no”. The trouble with syntax highlighting in markup languages is that usually the syntax is much less important than the semantics but, because the markup commands are all mixed up in the text, highlighting the markup just makes the text even harder to read. I want “semantics highlighting”.

  2. Like HTML, it’s really verbose. Have a look at that picture above. When I read that my actual thought process goes something like: “Syntax highlighting LaTeX is textit – oh, wait, italics – hard.” Inline markup is distracting, so the less of it the better.

In the land of HTML, where every problem has been solved, these problems have been solved with specialised markup languages like Markdown, reStructuredText, and a million subtly-different Wiki formats. All these little languages work the same way: someone made a list of the top 15 or 20 things that you would want to do with text, and then created a language which lets you do those things really easily. So in Markdown, for example, you do “emphasis” (almost certainly rendered as italics) *like this*. This is an improvement over standard HTML <em>italics</em>, and a vast improvement over LaTeX \textit{italics}.

The other cool thing about these little languages is that they are easy to make meaningful highlight modes for. In Markdown, * means “use emphasis”, and it’s the only thing that could possibly mean “use emphasis” in that document (unless you drop down to HTML). So you can quite easily add a highlight mode for Markdown emphasis in your text editor, and it will be right 100% of the time.

So I took this idea, ran with it, and wrote Texdown. Texdown has nothing to do with Markdown except sharing a name and the idea of replacing a complex language with a miniature one. There is syntax for common LaTeX things – cite, ref, textit, textbf, texttt, and so on. It comes with a Vim highlight mode.

There is also a very simple extension system, written in Python, which lets you define custom “block extensions”. This is best described by example. I frequently want to insert small code snippets into my writing. I normally do this using a LaTeX verbatim environment. But for various reasons (pagination, ease of reference) I tend to end up wanting the code inside a labelled figure. Then, of course, you can’t really have a figure without a caption. So I end up writing quite a lot of mark-up every time I want to talk about some code. In Texdown, any contiguous collection of indented lines is called a “block”. If you annotate the first line of the block by ending it with “!!macroname”, then your custom function, macro_macroname, will be called during parsing with the contents of the block. Here’s how it looks for code descriptions:

This calls the macro named “floatcode”. You will see that the macro name in the above is coloured rather faintly, making it difficult to notice. This is because you usually will need to write this once and not change it. Here is the LaTeX code produced:

There are a couple of other ways to extend Texdown. Full details are on the Texdown main page.

Preemptively-answered questions:

Q. Where is the source code again?

A. lardcave.net/texdown for the information page, code.nyloncactus.com/hg/texdown for the source.

Q. I use Emacs, which has an actually decent LaTeX mode. So I don’t need this, right?

A. Maybe you do, and maybe you don’t. Emacs is much better at this than Vim, but you still get an awful lot of clutter – it makes guesses about what stuff inside LaTeX formatting commands should look like, but it doesn’t remove the commands themselves. If you’re happy with that, great.

Q. I use LyX / some other WYSIWYG editor. So I don’t need this, right?

A. Right. If you like LyX. I couldn’t bear it when I tried it, but that was ages ago and it has (surely) improved.

Q. Why didn’t you use Restructured Text?

A. I don’t like the syntax.

Q. So this is a markup language on top of a markup language on top of a markup language?

A. Yes, but PostScript is also a (programmable, extensible) markup language. It’s turtles all the way down.

Q. I like the concept, but I don’t like Texdown very much.

A. In that case I have you half-brainwashed already, and if you are a more-than-casual LaTeX user you should definitely try out a couple of other macro languages for LaTeX, or write your own. It’s worth it. Texdown solves a very personal set of problems, so it’s definitely not for everybody, but the minilanguages-for-LaTeX concept is much bigger than Texdown.

As far as other markup languages go, you may be interested in looking at reStructuredText or asciidoc.

Q. You only did this because you don’t know LaTeX well enough to make it look nice!

A. Yes.

Q. All of this stuff could be done using LaTeX macros and it would be just as easy to edit!

A. Maybe. I doubt it.

Q. Script language programmer!

A. LaTeX nerd!

Newer entries | Older entries