About

I'm Nicholas FitzRoy-Dale, a software developer in Sydney, Australia. I'm interested in embedded systems and operating system research, code optimisation, 8-bit music, rock climbing, shiny things...

Personal blog

Contact

Mon
Jan 13
2020

Linux binaries as portable executables: a proposal for hypervisor-mediated Linux syscall reimplementation on macOS

The Linux kernel is well-known for its syscall ABI stability, which means that the semantics of the kernel system-call interface don't change between releases (apart from non-breaking bug fixes, and the addition of new features). This feature of Linux is so well established that several alternative implementations of the Linux system-call interface exist. Perhaps the most well-known one is FreeBSD's Linuxolator, through which FreeBSD provides a kernel module, linux.ko, which includes a Linux system-call interface implementation. Linux binaries running on FreeBSD are configured to use the Linux syscall interface, rather than the standard FreeBSD one, by changing a pointer in the (kernel level) process structure. On Windows, the Windows Subsystem for Linux also works by trapping system calls and translating them to appropriate Windows NT system calls.

This method, particularly FreeBSD's implementation, is a very integration-friendly way of running Linux binaries: the binary has immediate and direct access to the host file system and network, can start host-native binaries using fork and exec, and so on -- modulo bugs in the implementation, a Linux binary should be behaviourally indistinguishable from a native binary.

By contrast, the typical way to run Linux binaries on a Mac is to use a virtual machine -- use CPU virtualisation features to boot the Linux kernel in its own isolated space, and then run binaries as normal. This has the advantage of compatibility, because you're running real Linux, but it means that the Linux process is rather isolated from the rest of the machine: in particular, it will typically have its own filesystem and network interface, and it runs in its own "world", unable to launch host-native binaries or interact meaningfully with the host system in other ways (indeed, this isolation is a key feature of virtual machines). Even Docker for Mac uses a virtual machine, presumably so that it can be compatible with the many thousands of Dockerfiles and Docker images which assume that they are running on a complete Linux system.

As a POSIX-compatible system (and indeed as a 4.4BSD and FreeBSD derivative), macOS provides very similar core functionality to Linux, so it should be possible to provide a Linux system-call reimplementation which runs natively on macOS. Such a system would provide FreeBSD-like Linuxolator functionality for macOS.

Nonetheless, the virtual-machine approach has its advantages. The narrowness of the the interface provided by a virtual machine monitor means that neat tricks, such as task snapshotting, suspension, and network transparency become possible. The isolation provided by a VM makes it is easy to control things like file visibility, and memory and other resource usage. Finally, the host-specific portion can be relatively generic, relying on POSIX functionality and a host-specific hypervisor interface, rather than hooking directly into the host's system-call implementation, which would allow for portability.

I therefore propose a hybrid implementation: a simple Linux-syscall-compatible unikernel, running in a hypervisor, which communicates with the host to perform network and file operations (using hypercalls). Ideally, the bulk of the syscall complexity can be kept to the unikernel layer. The unikernel would be designed to minimise hypercalls, to improve overall system speed: as just one (classic) example, the frequently-used gettimeofday syscall can be implemented entirely inside the virtual machine. The complete system would look like this:
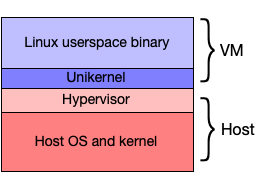
Block diagram

Possible use case: Linux binaries as future-proofed, fixed-interface artefacts

Linus Torvalds is often quoted as saying "We do not break userspace" (though if you click that be warned that he expresses it in classic Linus style, i.e. by ripping into someone). As discussed above, this means that the semantics of the kernel ABI, as defined by the system-call interface, shouldn't change between versions.

This is an important rule for Linux, because the kernel developers do not co-ordinate kernel releases with user-level code -- even fairly low-level code such as the C library. This is in contrast with other systems, such as FreeBSD and macOS, where new kernel releases are tightly co-ordinated with associated user-space changes. However, Linux's ABI stability has other advantages beyond allowing the kernel developers not to get involved in user-space code: it makes it easy, for example, to implement alternative low-level interfaces to the kernel, as can be seen in the variety of libc implementations supporting Linux, or indeed to bypass a low-level interface and communicate directly with the kernel, as the Go programming language does when targeting Linux. And, on the other side, as discussed above, it means that alternative implementations of the Linux syscall interface do not require continuous changes as new versions of Linux are released.

There are several classes of program which are difficult to get running on macOS, relatively stable (in that they do not require continuous updates), and which benefit from tight system integration. Commercial tools provided in binary-only formats (such as those required for working with FPGAs or for designing electronic circuit boards) are one example. Another is compilers such as the GNU Compiler Collection: GCC is notoriously difficult to compile for macOS, and typically benefits from direct access to the host filesystem such that running it in a fully-fledged virtual machine is rather painful.

For these sorts of tools, the approach described above seems appropriate: the binary would ship with the Linux-specific libraries it requires, but would otherwise run as a native application, with direct access to the host's filesystem and direct ability both to run host-native binaries, and to have host-native binaries invoke the binary (for example, one could imagine a macOS-native build system which runs a Linux-native C compiler).

Possible problems

WSL2: Microsoft recently replaced WSL with WSL2. WSL2 abandons system-call emulation in favour of virtualisation: unlike the original WSL, WSL2 runs a complete Linux kernel in a virtual machine, behaving rather similarly to Docker on macOS. The stated reasons for the change are to improve filesystem performance and to provide better system-call compatibility. I should investigate whether these issues will also be a problem on macOS. It's worth nothing that Windows has significantly different filesystem semantics than Linux, and the kernel lacks efficient implementations for system calls like fork(): in other words, it may be that the NT kernel is dissimilar from Linux in ways that the macOS kernel is not.

Other work

Noah is a very similar project: it provides a hypervisor which traps Linux system calls and translates them to macOS native calls. It differs from this proposal in a couple of ways: firstly, the system-call emulation runs on the macOS side of the hypervisor, which limits the amount of optimisation that can be done before making hypercalls; more significantly, Noah downloads an entire Linux distribution and runs Linux binaries in a separate "Linux world", with relatively-little synergy with the rest of macOS, rather like a traditional virtual machine.

Tue
Nov 12
2019

Gmail and Hotmail discriminate against self-hosted email

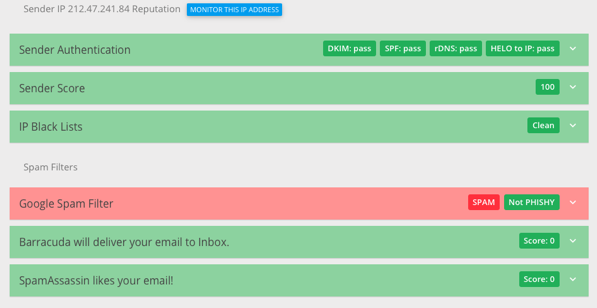
Here is a portion of a Glockapps report on email deliverability -- the email in question was a personal email of the kind that I might send to a friend on gmail or hotmail.

glockapps email deliverability report

This report apparently shows that I have done the right things with regard to properly identifying my email: reverse DNS, SPF, and DKIM are all set up correctly. Additionally, my site (obviously!) doesn't send spam, as hinted at by sender score and blacklist results. However, all test emails sent to gmail and hotmail addresses went to spam. This was particularly entertaining recently when a Google recruiter contacted me several times because he didn't bother to check his spam folder -- that's right, even if the thread was initiated by a gmail user (and your responses thus have a giant, unforgeable string in their In-Reply-To), gmail will still happily spam-filter your replies!

Google does not provide any tool to give insight to low-volume self-hosted email providers. Their postmaster tools don't show any information until a sufficient volume of email has been sent -- their guidelines are hundreds of emails per day, which indicates that these tools are geared towards businesses, rather than individuals. However, I strongly suspect that I do know the reason, and that it's related to my choice of hosting provider: the netblock that my email server's IP address is part of has a low reputation.

Frustratingly, there is no way to know which netblocks are "clean" and which aren't without trying some. This process is slow, expensive, and aggravating. The secrecy and mutability of the lists means that there are vastly conflicting views about the efficacy of gmail and hotmail's spam protection; see for example this Hacker News thread.

It's grimly amusing to know that the state of the art in commercial spam filtering is a 90s-era secret netblock blacklist, but it's also very concerning that the consequence of major email hosters making understandable (if lazy) decisions has such a chilling effect on self-hosted email.

Tue
Nov 12
2019

Don't use Scaleway for self-hosted email

I've been using Scaleway for my personal email server for almost 18 months now, and sending email has been troublesome almost from the start, with issues that Scaleway support apparently doesn't understand or, if they do understand, are unable to fix. Both are related to the netblock that my IPs are assigned from.

For the first server, which runs a private mailing list, the entire /23 that it is a part of is listed as part of the Spamhaus RBL. Scaleway seems unwilling or unable to remove it as the relevant ticket has been open for eight months.

For the second server, which runs my primary email domain, the netblock from which Scaleway assigns IPs is apparently marked as DUN, i.e. dynamically-assigned IP addresses assigned to Internet users connecting via non-permanent connections such as ADSL. Many mail hosts, including quite important ones like Gmail and Hotmail, correspondingly spamfilter the entire netblock. Scaleway is unable to remedy this situation. Support has been attentive but incompetent.

Update, late November: Scaleway has now managed to remedy the second problem, but not the first.

Fri
Oct 11
2019

MailMate: inverted three-pane view

Just discovered that MailMate (for macOS) lets you write custom views. Here is a trivial one which flips the normal three-pane view so that the message viewer is above the message list, rather than being stuck in the bottom third of the screen. It's based on a default as described in this blog post.

mailmate inverted three-pane view

To use it, download messageabove.plist, rename it so it ends in .plist, copy it to ~/Library/Application Support/MailMate/Resources/Layouts/Mailboxes (which you will probably need to create), restart MailMate, and select the new layout from View ➤ Layout.

Sat
Jul 20
2019

Bridged networking with qemu on Linux

This document describes setting up qemu system emulation with an IP address which is visible on the host's network using systemd-networkd and qemu-bridge-helper. This makes the system running inside qemu accessible externally. This procedure was developed on a Debian 10 (Buster) system but should work with any system capable of using systemd for network configuration.

The hardest part of this process was digging through the layers of HOWTOs on the Internet which recommended things which were either deprecated in modern Linux systems or simply don't work. As such, I expect the details to go out of date quickly, but the high level shouldn't change quite so fast:

  • You'll need to create a network bridge device and bind your default-route NIC to it.
  • You can then create a tap device attached to the bridge for qemu to use. Qemu can set up the necessary tap device using qemu-bridge-helper if you have configured it appropriately.
  • Having done this, you will still need to configure the host's firewall to allow packets to move across the bridge.

Create your bridge using systemd-networkd. This follows the Arch instructions. To summarise:

  1. Define the bridge itself by creating /etc/systemd/network/br0.netdev:
    [NetDev]
    Name=br0
    Kind=bridge
    
  2. Bind your Ethernet connection to the bridge by creating /etc/systemd/network/br0-bind.network:
    [Match]
    Name=en*
    
    [Network]
    Bridge=br0
    
  3. Specify the bridge IP configuration by creating /etc/systemd/network/br0ip.network:
    [Match]
    Name=br0
    
    [Network]
    DHCP=ipv4
    IPForward=true
    

Enable systemd-networkd: sudo systemctl enable systemd-networkd.service

Start or restart systemd-networkd: sudo sudo systemctl start systemd-networkd.service

This will change the IP address of your default route interface (it will now be the bridge).

Make qemu-bridge-helper setuid: to set up a bridge as a normal user, qemu-bridge-helper must be run as root. Do this by adding the setuid bit, sudo chmod +s /usr/lib/qemu/qemu-bridge-helper (understand the security implications, which, as far as I can make out, are that unprivileged users could create arbitrary bridges bypassing firewall rules (in the best case), or effectively become root (which is the worst case for any setuid binary, because it may have security bugs)).

Allow user access to the bridge from qemu-bridge-helper: Create or modify /etc/qemu/bridge.conf:

allow br0

Allow packet forwarding across the bridge: Actually you don't need to do anything here, because you added IPForward=true above. If you hadn't, you would only be able to access the host IP from inside the Qemu-hosted machine.

Fix name resolution: If you were previously using NetworkManager for your networking, you will need to switch to systemd-resolved instead, because systemd-networkd expects it. sudo systemctl enable systemd-resolved.service, sudo systemctl start systemd-resolved.service, and cd etc; sudo rm resolv.conf; sudo ln -s /run/systemd/resolve/resolv.conf resolv.conf. More information; also search "resolv" here.)

Configure the qemu run by adding -nic bridge to your qemu command line.

Why do we need a bridge anyway?: From the Arch wiki (which is a great resource): a bridge is a network switch, but implemented in software. Above, we created a bridge and added the default-route NIC to it. When qemu starts and runs qemu-bridge-helper, it creates a new tap device, which is effectively a virtual NIC with its own MAC address, and connects that device to the bridge. With our iptables configuration, that's all we need to do: routing to the right network segment is done by the kernel.

Tue
Apr 9
2019

Self-organising map on the Iris dataset

A self-organising map is a dimensionality reduction technique -- given high-dimensional data, it will generate a 'map' which separates that data spatially in a lower number of dimensions.

This video visualises my implementation of a 2D self-organising map working on the Iris data set. This data set has four dimensions and three categories. In the video, at each timestep, the colour of each element shows the category which it responds to best (as determined by the sum of Euclidean distances between its weight vectors and each input, per category).

Wed
Nov 21
2018

macOS Server firewalls port 80

Not only does macOS Server start an httpd on ports 80 and 443, it also apparently sets up firewall rules so that if you are not running the supplied server, you cannot receive anything on the ports. This seems a bit anti-social; does anybody know why? A quick fix is to remove the offending lines from /Library/Server/Firewall/Anchors/combined_anchor.txt and reload the firewall with pfctl -F all.
Tue
Oct 16
2018

Reading and writing Dreamcast Visual Memory Units with an Arduino

A long time ago I wrote a post on accessing Sega Dreamcast VMUs. This is an update to that post which significantly improves the read support to the point where it works reliably using a standard Arduino.

I should add that I thought my read support was reliable last time, until I got reports from people who were having trouble with it and bought a few more VMUs to test with. I am quite a bit more confident in the new version, because it doesn't take any shortcuts: the previous version used "dead reckoning" for some parts of the protocol, but this version is more than fast enough to keep up with the VMU without making any assumptions about its state.

This post is probably even less accessible and interesting than most of my code posts, though if you're into assembly language optimisation then you'll love it. If not, the summary is that it's practical to use an unmodified 16MHz Arduino to receive Maple bus data (and even arbitrarily-long packets) by running it as a logic analyser running at about 5 million samples per second. The rest of the post is about the optimisation story that got me to this point.

What's a VMU?

A Visual Memory Unit (Visual Memory System in the USA) is primarily a save game card for Dreamcast systems, but it also has a little LCD and buttons. They look like this:

Dreamcast VMU

VMUs slot into the Dreamcast controller and can display images during gameplay.

vmu in controller

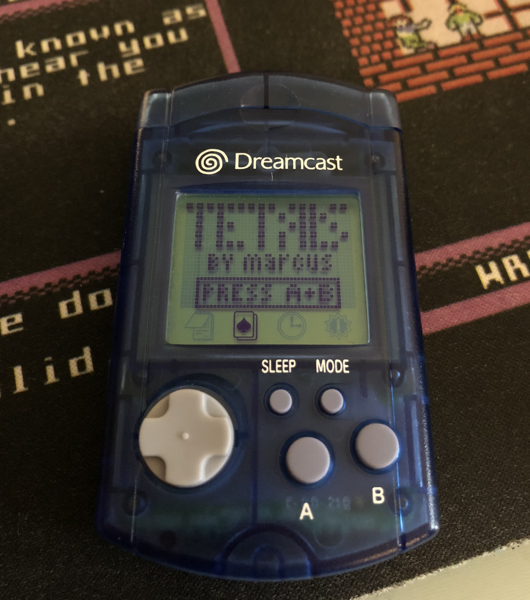
From my perspective, the most interesting thing about them is that they also function as completely self-contained handheld gaming units (for some reason):

vmu tetris

Actually, that's a lie. The most interesting thing about them is that it seemed like it should be possible to read and write data on them using nothing more than a Dreamcast controller and an Arduino. This post is mostly about how you do that.

Background

VMUs communicate with the mothership (which is usually a Dreamcast) using a protocol called Maple. This is pretty damn fast (for an glorified memory stick), running at 2 megabits per second, sender clocked. Here's Marcus Comstedt's writeup of the wire protocol. The summary is that it uses two wires (plus power and ground), with the data and clock lines alternating every transition, and signals changing at speeds of up to 0.5ms (or even faster, it turns out, when the VMU is in control).

Receiving VMU-clocked data with an Arduino

There are two major VMU hardware hacking efforts that I've found, Marcus Comstedt's and Dmitry Grinberg's. (Both of these sites are fantastic.) Marcus and Dmitry point out that sending data to the VMU is very easy, because you can send at whatever speed you like. However, receiving data is rather more difficult, as the VMU controls the speed.

In pseudocode, receiving this data would look something like this, assuming the clock and data pins are called PIN1 and PIN5 (following Marcus' naming scheme):

1. If there's no more data to receive, finish.
2. Wait for PIN1 to go LOW.
3. Read and store the bit from PIN5.
4. Wait for PIN5 to go HIGH, if it isn't already.
5. Wait for PIN5 to go LOW.
6. Read and store the bit from PIN1.
7. Wait for PIN1 to go HIGH, if it isn't already.
8. Go to step 1.

This pseudocode receives two bits, and takes into account the fact that clock and data pins switch roles every bit. On an Arduino running at 16Mhz, we have 16 cycles per millisecond. At 2Mbits/sec, that means that at the very most we have to complete the above pseudocode, to receive two bits, in 16 cycles.

No problem, right?

Doing the obvious thing (and failing)

The obvious thing to do is something like this, using slightly-abridged AVR assembly language with labels matching the pseudocode above:

1:
	; TODO - check end condition
2:
	SBIC PIN1		; skip the next instruction if PIN1 is low
	RJMP 2b			; go back and read PIN1 again
3:
	SBIC PIN5		; skip the next instruction if PIN5 is low
	OR data, 1		; Store the bit
	LSL data, 1		; Shift the data register left by 1 to receive the next bit
4:
	SBIS PIN5		; skip the next instruction if PIN5 is high
	RJMP 4b			; PIN5 was low, so try again
5:
	SBIC PIN5		; skip the next instruction if PIN5 is low
	RJMP 5b			; PIN5 was high, so try again
6:
	SBIC PIN1		; skip the next instruction if PIN1 is low
	OR data, 1		; Store the bit
7:
	SBIS PIN1		; skip the next instruction if PIN1 is high
	RJMP 7b			; PIN1 was low, so try again
8:
	ST X+, data		; Write the data to memory
	LDI data, 0		; Clear data
	RJMP 1b			; go back to start

Straightforward, but rather problematic:

  • We're only writing two bits per byte, which sucks, but we can fix it by unrolling the loop four times.
  • We take different numbers of cycles to perform the different steps, and particularly writing the data to memory and jumping back to the start of the loop is very slow (4 cycles, or 1/4 of a millisecond). This matters because even if the VMU operates at 2Mbits/sec on average, not all cycles are the same length.
  • More importantly, it takes 18 cycles, which is too slow.
  • Even if it were faster, it would still need to check the end condition (at the moment it's an infinite loop).

Without going into too much more detail here, it's possible to get a loop like the one above down to 16 cycles, but it doesn't seem that easy to make it significantly better than that. As discussed above, 16 cycles for two bits is the bare minimum, but practically speaking 16 cycles is too slow: firstly, the VMU is sometimes faster than 2Mbits/sec, and secondly even if it were not, it's easy for transmitter and receiver to get out of phase in such a way that the receiver misses some bits:

digital ringing

Dmitry's approach to this problem is to use a significantly faster processor, an STM32 clocked at 80MHz, but I wanted to stick with Arduino, so couldn't follow his lead.

Marcus had a different solution: you don't actually need to implement the Maple protocol in real time. All you need to do is make sure you capture every signal change on the two pins. If you store the complete set of signal changes, you can do the decoding "offline", after the receive has finished. In effect, you make a special purpose logic analyser to capture the communication, and then decode it later.

Arduino as logic analyser

The great thing about the logic analyser approach is that it's so conceptually simple. Here is the pseudocode:

1. If there is no more data to receive, finish.
2. Read and store PIN1 and PIN5.
3. Go to step 1.

Unfortunately, the simplicity comes at a cost. Every bit involves two signal transitions, and we have to capture both of them. Since one bit arrives every half millisecond, that means we have a quarter of a millisecond to read and store the two samples -- or just four Arduino clock cycles.

Marcus used a special hardware device as his logic analyser, but I didn't have one of those.

Here is the naive Arduino code to do the above, annotated with the number of clock cycles each instruction takes. I've also started using real registers -- here the working register is r18 (which is a "scratch" register for AVR):

1:
	; TODO check end condition
2:
	IN r18                       ; 1 cycle: read both CLOCK and DATA
	ST X+, r18                   ; 2 cycles: write clock and data to memory
3:
	RJMP 1b                      ; 2 cycles: loop

We can immediately see the problem with this -- it's too slow! Reading, writing, and looping take five clock cycles, and we have a budget of 4. It's also rather wasteful, because we're using a whole byte for clock and data lines. And on top of all that, we still haven't checked the end condition, so this loop will run forever.

What happens if we put more bits into the data word, and move things around so that we have an equal number of cycles for each sample?

1:
	; TODO check end condition
	SWAP r18                      ; 1 cycle: swap upper and lower nybbles of r18
	IN r19                        ; 1 cycle: read clock and data into r19
	OR r18, r19                   ; 1 cycle: r18 = r18 | r19
	ST X+, r18                    ; 2 cycles: write clock and data to memory
	IN r18                        ; 1 cycle: read clock and data into r18
	RJMP 1b                       ; 2 cycles: loop

This is much nicer, though it's harder to understand. We now use two registers, r18 and r19. We store two samples in one byte by using the SWAP instruction, which swaps the lower four bytes (one nybble) and the upper four bytes. We just need to ensure that we have no more than four bits of input (we only have two, CLOCK and DATA) and that these bits show up only in the lower four or upper four bits.

This still isn't good enough, though -- four cycles per bit is too slow, practically speaking, even if we were checking the end condition, which we aren't. Also, since we only have two bits of data, shouldn't we be storing four samples per byte? Packing extra samples into a byte is important because the Arduino only has 2 kilobytes of RAM. At two bits per byte, that gives us an absolute maximum message length of 512 bytes -- but practically speaking, we get far fewer than that.

Without going into the details, it's possible to store four samples per byte if you ensure that your inputs are in the lowest two bits by using LSL (shift register contents left by one bit) and SWAP.

Hardware hacking

After some experimentation, I had an implementation that could read four samples in 16 cycles, check an end condition, and store all four samples in one byte. But it was still too slow: as discussed above, to accurately receive 2Mbits/sec, we must be faster than 2Msamples/sec, not exactly the same speed.

But then I thought: we're stuck with the Arduino, but we can still make hardware changes. What if we connected the data and clock lines to multiple places on the Arduino? Specifically, what if we connected them twice: in the lowest two bits of one port (PORTB), but also on another port (PORTC), two bits further up? If we did that, we wouldn't need to do so much shifting and swapping, because the inputs would be, in effect, pre-shifted.

After making this change, and doing a bit of experimentation, I ended up with the following. The comments show the cycle count followed by positions of each sample across the three registers it uses.

.macro read_four_samples
	IN r18, IOM2       ; 1; ----51-- ------51 ----51--
	OR r18, r19        ; 1; ----5151
	SWAP r18           ; 1; 5151----
	IN r19, IOM1       ; 1; 5151---- ------51
	OR r18, r20        ; 1; 515151--
	OR r18, r19        ; 1; 51515151
	IN r19, IOM1       ; 1; 51515151 ------51
	ST X+, r18         ; 2; -------- ------51
	IN r20, IOM2       ; 1; -------- ------51 ----51--
.endm

A couple of comments on this:

  • It reads one sample every 3 cycles, for an effective sample rate of 5 1/3 MSPS, which is sufficient.
  • It uses three registers, the contents of which are described in the comments.
  • The delay between each sample being taken is equally balanced, assuming the thing following the macro is something that takes two cycles (i.e. an RJMP)

To use the macro, unroll it several times. Because the macro both begins and ends with an IN (which takes a sample), you have two spare cycles between each macro invocation to do 'housekeeping'. Below, we use this feature to bail out of the infinite loop if we run out of free space:

1:
	read_four_samples

	; read second byte:
	NOP
	NOP
	read_four_samples

	; read third byte:
	NOP
	NOP
	read_four_samples

	; read final byte
	DEC r30                ; have we run out of space?
	BREQ _maple_rx_end     ; yes, stop writing
	read_four_samples

	; lead-out: 2-cycle jump to read the next 4 bytes.
	RJMP 1b

Supporting large packets

As discussed, the Arduino I'm using has 2KB of RAM, and I'm sampling at over 5MSPS. This gives me approximately the world's worst logic analyser, running out of memory in about one-nothingth of a second. Although in theory you can store a sufficient number of samples in 2KB, in practise the VMU spends a lot of time waiting around doing nothing between blasting out small chunks of reply, which means a lot of sample space is occupied by this dead air.

Fortunately, all commands which produce long replies from the VMU are non-destructive: they're device IDs, or flash reads. So the solution is to repeat the command, and ignore everything we've already seen on the repeats. This means we can build up the complete response one 2KB chunk at a time.

How do you know how much to ignore? You count sample periods. If the first reply produces 2048 samples, then just wait 2048 sample periods the next time.

This obviously requires that the VMU be very deterministic in its timings, which, fortunately, it is. It doesn't seem like this approach should work nearly this easily, but it does.

It still sucks!

This support is far from perfect -- I still get bad reads somewhat frequently. This is less of a problem than you might expect, because the Maple library (and in particular the VMU dump program) reads multiple times until it gets two which are the same. This seems stable (if slow). There's definitely room for improvement here: the first thing I'd like to try next is improving the hardware. I'm using a breadboard to split my clock and data signals across two pins, and I suspect that this introduces extra capacitance and/or ringing which interferes with the sampling.

Read and write support is also very slow. There is some low hanging fruit here -- a big reason for the slow-down is that each transaction transfers 1.5KB of data from the Arduino to the Python library, and this could be slimmed down significantly (by having the Arduino translate the samples into bytes).

To be honest, I'm surprised that this was practical at all.

Getting the code

Get it from Bitbucket Github:
$ git clone https://github.com/nfd/arduino-maple

You'll need Python 3 and the pyserial library:

$ pip3 install pyserial

Running the code

Build and upload the binary to your Arduino. You will need to edit the serial port in the Makefile.

$ make upload

Displaying an image

See the README and vmu_image.py for (very simple) image format.

$ python3 vmu_image.py -p /dev/tty.usbserial megaman.txt

Uploading a VMU game

$ python3 vmu_flash.py -p /dev/tty.usbserial tetris\ vmu.vms

Tetris is available from Marcus' site.

Reading VMU data

$ python3 vmu_dump.py -p /dev/tty.usbserial vmudump

Use as a library

Have a look at the MapleProxy class in maple.py. The utility programs above are good examples of how to use the library.

Fri
Oct 5
2018

Copying to system clipboard on macOS with tmux 2.7 and mouse mode

The configuration line to place in .tmux.conf is:
bind-key -T copy-mode-vi MouseDragEnd1Pane send -X copy-pipe-and-cancel "reattach-to-user-namespace pbcopy"
You will also need to install reattach-to-user-namespace with, for example, brew install reattach-to-user-namespace. Remember also to run tmux kill-server to actually see the changes. Note that doing this will kill your tmux server. :) These sorts of blog posts are quite tedious, but this one exists because tmux has changed the syntax required to do this about one billion times (judging by the diversity of posts out there about it). The way to do this depends on:
  • Your terminal -- terminal.app (iterm2 metal mode is still pretty unpolished),
  • Your OS -- it's obviously macOS-specific but may also only apply to Mojave or High Sierra upwards -- in particular, apparently some versions of macOS / terminal combination don't need reattach-to-user-namespace,
  • Your version of tmux. From what I can tell, but haven't verified, the above settings are valid on tmux 2.4 and above, and
  • Your other tmux configuration. This setting is for vi copy mode. If you aren't using vi copy mode, you can enable it with the setting set-window-option -g mode-keys vi.
Mon
Sep 10
2018

Vim is not an IDE, episode three thousand

Update (2020-01-12): The sane approach to all of this is not to have a Vim-specific Python which contains the virtualenv at all. Bram Moolenar's recent experimental work on "Vim 9" eliminates (I think) the Python interpreter in Vim in favour of running Python out-of-process, which seems sensible -- though I wish he would make the interface a proper API instead, rather than a way to invoke Vimscript -- then he could make the next obvious improvement and eliminate Vimscript!

Writing Python in Vim has become more fun, or at least more interesting, in the last few years with the preponderance of "opinionated" (which means not configurable) Python checkers and linters, and packages like ale for Vim. However, Python and Vim are certainly not opinionated and there are hundreds of ways to structure your projects and workflow. This freedom is wonderful and amazing but every so often it means an hour or two of digging to find out why something's not working properly.

Let's consider the case of running a single linter, Pylint, inside Vim. Typically I'm working on more than one project at once -- often a library and a user of that library, or perhaps a client and a server. This means that there may be a couple of virtualenvs involved for different projects, or possibly a combination of one project with a virtualenv and one project without.

Under ale, pylint runs as a separate process, and ale's python integration decides which one to run like this:

  • First, it looks for a virtualenv, which is a directory called "virtualenv", "venv" or a couple of other options in the directory of the file being edited.
  • If it doesn't find one, it moves up one directory and checks again, repeating this process on failure until it gets to the root.
  • If it still hasn't found a virtualenv, it looks at the VIRTUAL_ENV environment variable and uses that.
  • If that environment variable isn't set, it uses whatever first matches "pylint" (by default) in the PATH.

If all the files you're editing use virtualenvs, and you're not doing something like editing files on an exported fileshare from a virtual machine running a different operating system, which unfortunately I do quite often, this works fine.

If, however, you happened to be inside a virtualenv when you started vim, the VIRTUAL_ENV environment variable will be set (and the PATH will be modified to put virtualenv/bin first). This means, following ale's rules above, that any file which doesn't have its own virtualenv will end up using the virtualenv of whatever was active when you started.

This becomes problematic when you're using project-specific Pylint extensions, such as pylint_django, because pylint will fail to start if it can't load the extension, and to decide whether to use the extension or not basically involves replicating ale's virtualenv-searching process and looking for both pylint and pylint_django.

Here's how I did that, in ~/.vim/after/ftplugin/python.vim:

python3 <<EOF
import vim
import imp
import os
import glob

def find_virtualenv(virtualenv_names):
    cwd = vim.eval('getcwd()')
    while cwd != '/':
        for virtualenv_name in virtualenv_names:
            venv_path = os.path.join(cwd, virtualenv_name)
            if os.path.exists(venv_path):
                return venv_path

        cwd, _ignored = os.path.split(cwd)

    return os.environ.get('VIRTUAL_ENV')

# If we have a virtualenv, check to see whether it contains pylint and the
# django module. If we don't, just try to import both.  We can't even use
# ale's "ale_virtualenv_dir_names" here, because it's not set yet.

virtualenv_path = find_virtualenv(['virtualenv', 'venv'])  #vim.eval('ale_virtualenv_dir_names')

if virtualenv_path:
    has_pylint_django = glob.glob(os.path.join(virtualenv_path, 'lib/*/site-packages/pylint_django'))
else:
    try:
        imp.find_module('pylint_django')
        has_pylint_django = True
    except ImportError:
        has_pylint_django = False

if has_pylint_django:
    vim.command("let b:ale_python_pylint_options = '--load-plugins pylint_django'")
EOF

(Note that this will be using a possibly-completely-different Python, i.e. the one that Vim was compiled with.)

Using VIRTUAL_ENV makes sense, though using it as a last-resort fallback doesn't: it should probably be the first option picked. One sane way of using Vim would be to have a single off-path virtualenv for all the files you're editing. But that's not the way I work, so after some pain I eventually decided that the best approach is to ignore any virtualenvs in the environment, and just look for them on the path. Active virtualenvs set VIRTUAL_ENV and modify the path, so I added the following to my ~/.vimrc:

" Remove any virtualenv-specific directories from the PATH, and remove the
" VIRTUAL_ENV environment variable if it's set.
" The problem is that running vim from the command line pulls in the
" VIRTUAL_ENV environment variable if it's set, which is not usually helpful
" -- it means that Python modules without a virtualenv will end up using the
" one that happened to be active when I started vim. 
python3 <<EOF
import os
import vim
virtualenv_dir = os.environ.get('VIRTUAL_ENV')
if virtualenv_dir:
    newpath = ':'.join(elem for elem in os.environ.get('PATH').split(':') if not elem.startswith(virtualenv_dir))

    vim.command("let $PATH='%s'" % (newpath,))
    vim.command("let $VIRTUAL_ENV=''")
EOF

After all of this, which works and produces a somewhat-sane-feeling editing environment, I'm still not convinced I'm actually doing the right thing. IDEs, being project-based, have a much easier time. Basically it feels like I'm at the stage where I need to decide whether I'm actually creating a nice environment for editing, or whether I should give it up and move to VS Code.

Newer entries | Older entries