
2010
Sega Dreamcast Maple Bus Interface
Arduino-maple is a program for 16MHz Atmega-based devices (such as the Arduino) which enables them to impersonate a Sega Dreamcast for the purpose of communicating with devices attached to Sega's proprietary Maple bus. The practical upshot of this is that you can use an Arduino or similar cheap board connected to a PC to communicate with Dreamcast controllers and Visual Memory Units.
The code requires avr-gcc, and has been tested on Debian Linux, Mac OS X, and Windows (use winavr for Windows). It is still quite rough code, so proceed at your own risk. It is known to be able to read from and write to controllers and the Dreamcast Visual Memory Unit.
The code has very specific timing requirements and will almost certainly only run on an ATmega part clocked at a 16MHz using a crystal oscillator.
Download arduino-maple from bitbucket (or download a snapshot: arduino-maple-tip.tar.gz)
To set it up you'll need to compile the code and get it onto the Arduino (or other ATmega part). Make sure avr-gcc and friends are in your path, then type ''make''. If that works, ensure the port is correct for your computer in the Makefile (it's the line starting PORT=), and type ''make upload'' to run avrdude and upload the code.
After that, connect one end of a Maple bus to your Arduino. I did this by buying a Dreamcast controller on EBay for £4 and cutting the connector off. Attach the wires as follows:
- Blue: +5V
- Black / unshielded: Ground
- Red: Arduino Pin 8 / PORTB 0
- White: Arduino Pin 9 / PORTB 1
- Green: Leave disconnected (or connect to Ground if you like)
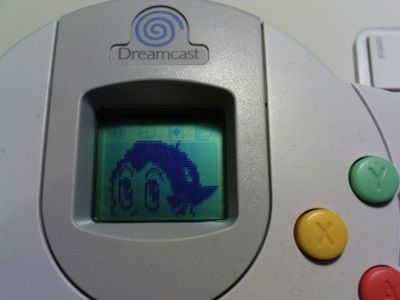
Once you have that set up, you can run a Python program, ''maple.py'', to test. If you have a VMU, ensure it is connected to the controller's upper port first. The program will print out information about the controller and VMU, display a picture of Astro Boy on the VMU, and sit in a loop reading the controller. Press some buttons on the controller, and you'll see the changes to the controller state displayed by the test code. Press ctrl-c to exit the test program.
Other test programs:
- ''vmu_dump.py'' dumps the contents of the VMU in the upper controller slot to disk. This will create a 128 KB file that you can flash, open with VMU Explorer, and so on.
- ''vmu_flash.py'' writes a VMU flash image to the VMU.
I owe a huge debt of thanks to Marcus Comstedt for his very helpful Dreamcast information pages, and to Ikalogic for their low-cost logic analyser.
Changes:
22/Oct/2010: Reading from the VMU is now stable thanks to several code tweaks. Also, no extra hardware is required (the previous version needed some external pull-up resistors). This was still much less stable than I wanted; see the updated code for a better approach.
24/Oct/2010: Reading from the VMU's flash is now supported.